websocket入门教程。小编来告诉你更多相关信息。
websocket入门教程
下面为网友们详细介绍websocket入门教程的电脑方面的小经验,下面小编为您详细解答
1. WebSocket介绍
WebSocket 是基于 TCP 的一种新的网络协议。
它实现了浏览器与服务器全双工通信——浏览器和服务器只需要完成一次握手,两者之间就可以创建持久性的连接, 并进行双向数据传输。
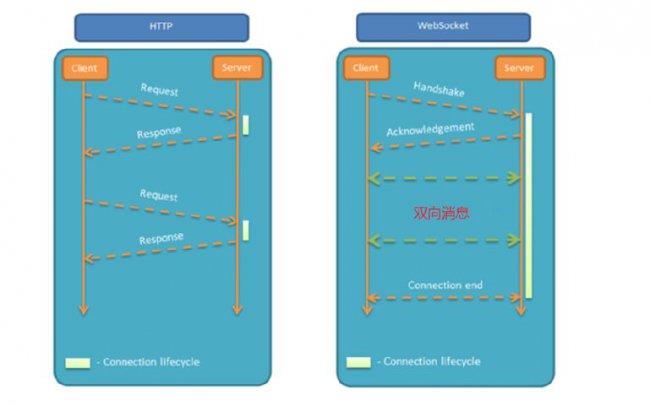
HTTP协议和WebSocket协议对比:
- HTTP是短连接
- WebSocket是长连接
- HTTP通信是单向的,基于请求响应模式
- WebSocket支持双向通信
- HTTP和WebSocket底层都是TCP连接

思考:既然WebSocket支持双向通信,功能看似比HTTP强大,那么我们是不是可以基于WebSocket开发所有的业务功能?
WebSocket缺点:
服务器长期维护长连接需要一定的成本 各个浏览器支持程度不一 WebSocket 是长连接,受网络限制比较大,需要处理好重连
结论:WebSocket并不能完全取代HTTP,它只适合在特定的场景下使用
WebSocket应用场景:
- 视频弹幕
- 网页聊天
- 体育实况更新
- 股票基金报价实时更新
2. SpringBoot结合WebSocket入门案例
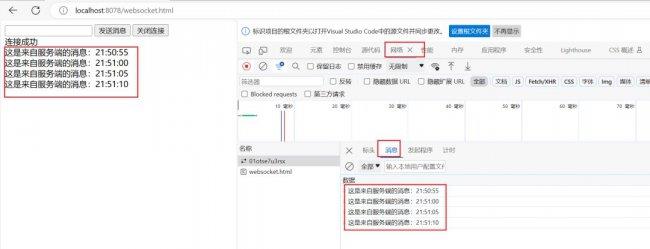
需求:实现浏览器与服务器全双工通信。浏览器既可以向服务器发送消息,服务器也可主动向浏览器推送消息。
结果展示:
2.1. 实现步骤
入门案例实现步骤如下:
- 1.直接使用websocket.html页面作为WebSocket客户端
- 2.导入WebSocket的maven坐标
- 3.导入WebSocket服务端组件WebSocketServer,用于和客户端通信
- 4.导入配置类WebSocketConfiguration,注册WebSocket的服务端组件
- 5.导入定时任务类WebSocketTask,定时向客户端推送数据
2.2. 代码实现
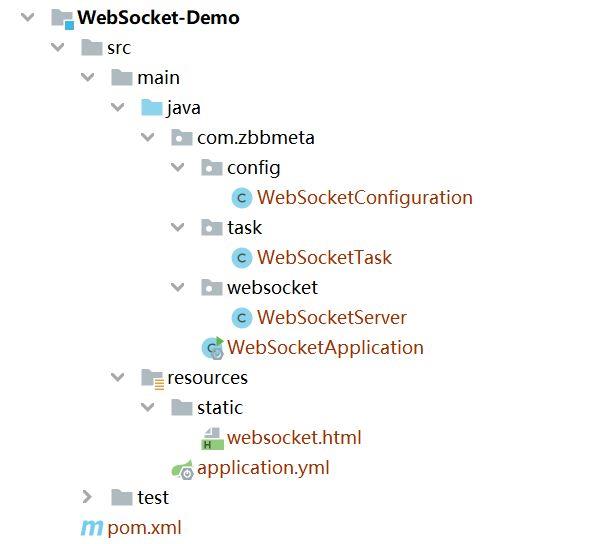
创建WebSocket-Demo,并导入对应依赖到pom.xml
- 完整项目结果
- pom.xml 依赖
4.0.0 spring-boot-starter-parent org.springframework.boot 2.7.15 com.zbbmeta WebSocket-Demo 1.0-SNAPSHOT 11 11 org.springframework.boot spring-boot-starter-web org.projectlombok lombok org.springframework.boot spring-boot-starter-test org.springframework.boot spring-boot-starter-websocket websocket入门教程。小编来告诉你更多相关信息。
websocket入门教程
【步骤一】:创建项目引导类
在java目录下创建com.zbbmeta包,在其包下创建WebSocketApplication引导类
package com.zbbmeta;import org.springframework.boot.SpringApplication;import org.springframework.boot.autoconfigure.SpringBootApplication;import org.springframework.scheduling.annotation.EnableScheduling;/** * @author * @description: TODO */@SpringBootApplication@EnableSchedulingpublic class WebSocketApplication { public static void main(String[] args) { SpringApplication.run(WebSocketApplication.class,args); }}【步骤二】:配置文件
在resources目录下创建application.yml文件,内容如下
server: port: 8078【步骤三】: 定义websocket.html页面
在resources目录下创建static,并创建websocket.html页面,内容如下:
WebSocket Demo var websocket = null; var clientId = Math.random().toString(36).substr(2); //判断当前浏览器是否支持WebSocket if(\'WebSocket\' in window){ //连接WebSocket节点 websocket = new WebSocket(\"ws://localhost:8078/ws/\"+clientId); } else{ alert(\'Not support websocket\') } //连接发生错误的回调方法 websocket.onerror = function(){ setMessageInnerHTML(\"error\"); }; //连接成功建立的回调方法 websocket.onopen = function(){ setMessageInnerHTML(\"连接成功\"); } //接收到消息的回调方法 websocket.onmessage = function(event){ setMessageInnerHTML(event.data); } //连接关闭的回调方法 websocket.onclose = function(){ setMessageInnerHTML(\"close\"); } //监听窗口关闭事件,当窗口关闭时,主动去关闭websocket连接,防止连接还没断开就关闭窗口,server端会抛异常。 window.onbeforeunload = function(){ websocket.close(); } //将消息显示在网页上 function setMessageInnerHTML(innerHTML){ document.getElementById(\'message\').innerHTML += innerHTML + \'
\'; } //发送消息 function send(){ websocket.onopen() var message = document.getElementById(\'text\').value; websocket.send(message); } //关闭连接 function closeWebSocket() { websocket.close(); }【步骤四】: 导入websocket依赖坐标
在pom.xml文件中添加websocket依赖
org.springframework.boot spring-boot-starter-websocketwebsocket入门教程。小编来告诉你更多相关信息。
websocket入门教程
【步骤五】: 定义WebSocket服务端组件
在com.zbbmeta.websocket包下创建WebSocketServer服务组件类
package com.zbbmeta.websocket;import org.springframework.stereotype.Component;import javax.websocket.OnClose;import javax.websocket.OnMessage;import javax.websocket.OnOpen;import javax.websocket.Session;import javax.websocket.server.PathParam;import javax.websocket.server.ServerEndpoint;import java.util.Collection;import java.util.HashMap;import java.util.Map;/** * @author springboot葵花宝典 * @description: TODO */@Component@ServerEndpoint(\"/ws/{sid}\")public class WebSocketServer { //存放会话对象 private static Map sessionMap = new HashMap(); /** * 连接建立成功调用的方法 */ @OnOpen public void onOpen(Session session, @PathParam(\"sid\") String sid) { System.out.println(\"客户端:\" + sid + \"建立连接\"); sessionMap.put(sid, session); } /** * 收到客户端消息后调用的方法 * * @param message 客户端发送过来的消息 */ @OnMessage public void onMessage(String message, @PathParam(\"sid\") String sid) { System.out.println(\"收到来自客户端:\" + sid + \"的信息:\" + message); } /** * 连接关闭调用的方法 * * @param sid */ @OnClose public void onClose(@PathParam(\"sid\") String sid) { System.out.println(\"连接断开:\" + sid); sessionMap.remove(sid); } /** * 群发 * * @param message */ public void sendToAllClient(String message) { Collection sessions = sessionMap.values(); for (Session session : sessions) { try { //服务器向客户端发送消息 session.getBasicRemote().sendText(message); } catch (Exception e) { e.printStackTrace(); } } }}【步骤六】: 定义配置类,注册WebSocket的服务端组件
在com.zbbmeta.config包下,创建WebSocketConfiguration配置类
package com.zbbmeta.config;import org.springframework.context.annotation.Bean;import org.springframework.context.annotation.Configuration;import org.springframework.web.socket.server.standard.ServerEndpointExporter;/** * @author * @description: TODO */@Configurationpublic class WebSocketConfiguration { @Bean public ServerEndpointExporter serverEndpointExporter() { return new ServerEndpointExporter(); }}【步骤七】: 定义定时任务类,定时向所有客户端推送数据
在com.zbbmeta.task包下,创建WebSocketTask类,使用Spring-Task进行定时发送
package com.zbbmeta.task;import com.zbbmeta.websocket.WebSocketServer;import org.springframework.beans.factory.annotation.Autowired;import org.springframework.scheduling.annotation.Scheduled;import org.springframework.stereotype.Component;import java.time.LocalDateTime;import java.time.format.DateTimeFormatter;/** * @author springboot葵花宝典 * @description: TODO */@Componentpublic class WebSocketTask { @Autowired private WebSocketServer webSocketServer; /** * 通过WebSocket每隔5秒向客户端发送消息 */ @Scheduled(cron = \"0/5 * * * * ?\") public void sendMessageToClient() { webSocketServer.sendToAllClient(\"这是来自服务端的消息:\" + DateTimeFormatter.ofPattern(\"HH:mm:ss\").format(LocalDateTime.now())); }}websocket入门教程。小编来告诉你更多相关信息。
websocket入门教程
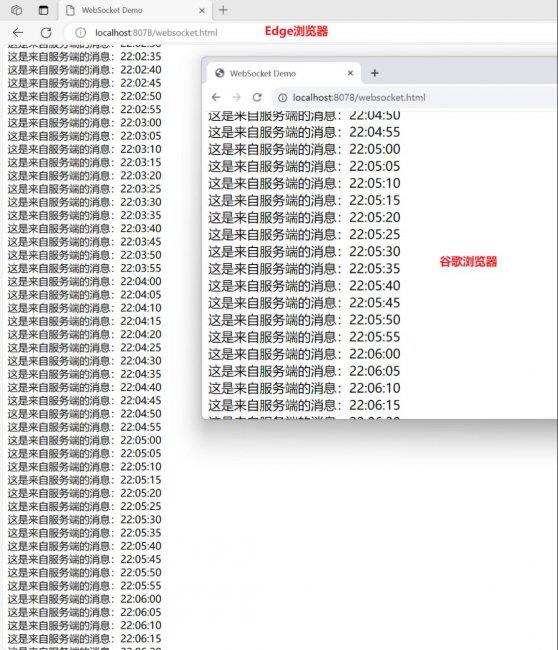
2.3. 功能测试
启动服务,浏览器,打开websocket.html页面浏览器结果
上面为您介绍的websocket入门教程的电脑IT小方法,供您全面了解参考!
本文内容由互联网用户自发贡献,该文观点仅代表作者本人。如发现本站有涉嫌抄袭侵权/违法违规的内容,请发送邮件至 5733401@qq.com 举报,一经查实,本站将立刻删除。本文链接:https://fajihao.com/i/257403.html